

Even if you are staging an otherwise vacant property, a topiary never looks out of place.
Use one to pretty up a kitchen island, add some color to a bathroom vanity, or decorate a mantel. This year I made topiaries from felt circles, folded and pinned onto a foam ball. What I love about this DIY project is that it looks elegant but not formal.
The container has the appearance of antiqued silver, but it's just a throw-away plastic flower pot. The edges of the felt are cut with pinking sheers, which I think adds an evergreen-like texture.
You can change the bow style and use your topiary at other times of the year as well -- pastel polka dots for springtime, multi-colored ribbons for summer, and raffia or burlap for autumn.
By then, you'll be living in your next home, having sold your house that's now on the market!
Container: what you need

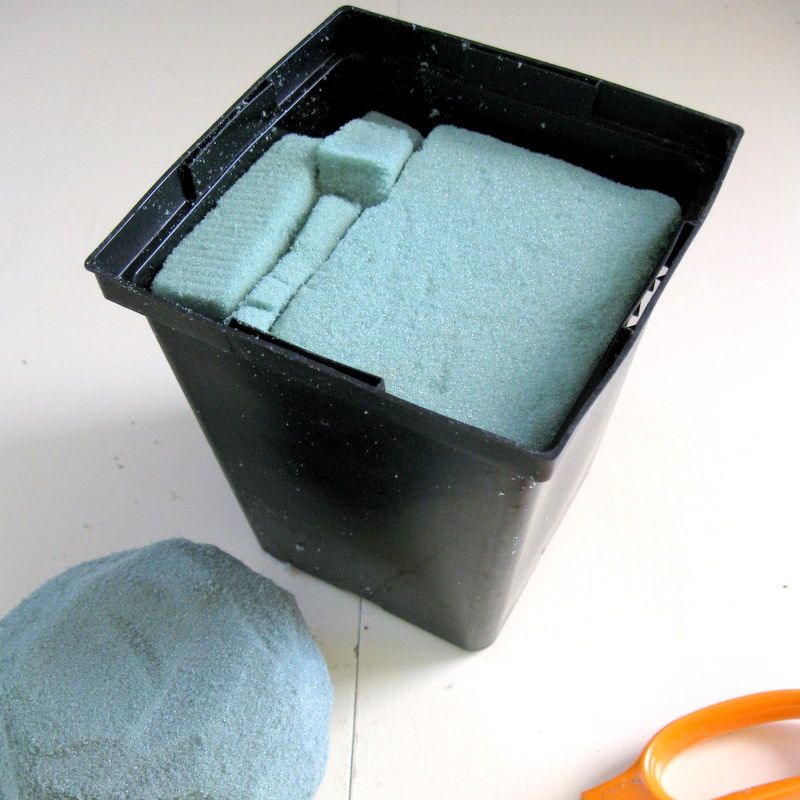
- 4-inch plastic flower pot
- Stones (or dried beans) to add weight the container
- Dry floral foam, enough to fill flower pot
- Scissors
- Marking pen that will show on side of container
- Glue gun and glue sticks
- Four or more thumbtacks (optional)
- Metallic silver spray paint
- Black craft paint
- 2-inch paint brush
- Disposable bowl
- Disposable latex gloves
- Rag
Container: how to do
Place stones in bottom of plastic container. Use a common, nursery flower pot that is flexible enough to withstand a thumbtack puncture without shattering. The stones will compensate for the top heavy ball of felt flowers.

Fit pieces of floral foam into container, creating a tight fit that will support the stick that is the stem of the topiary.
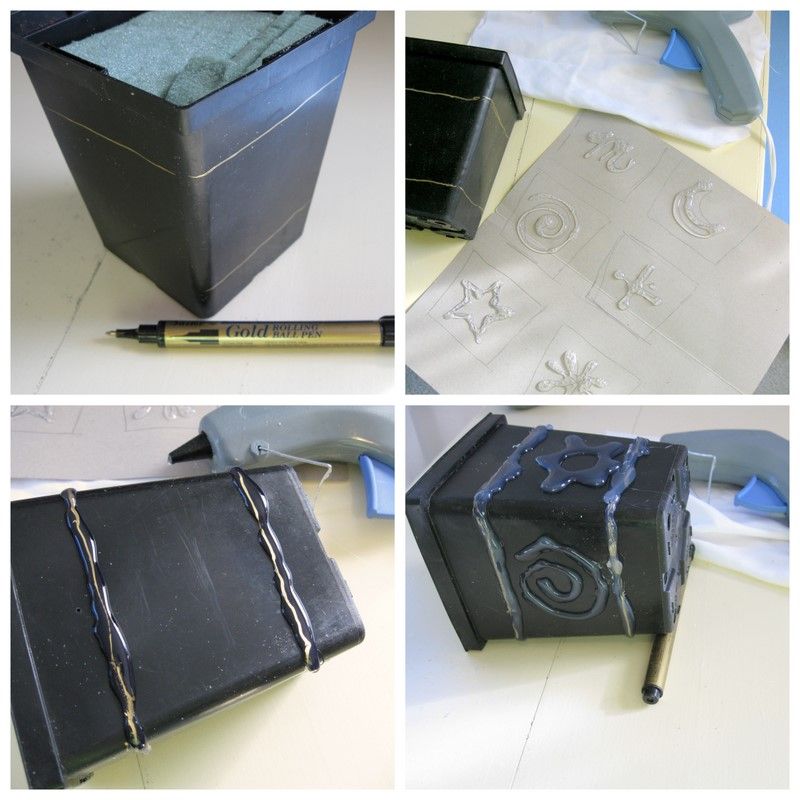
Using the marking pen, draw lines on the sides. You can use a strip of cardboard to guide you if you are not comfortable about drawing freehand. It doesn’t have to be precise.
Lay the container on its side. Heat the glue gun and trace the lines you made. With the glue gun, draw a swirl or star or an initial in the center of each side.
Practice with the glue gun on a scrap of cardboard if you are unsure of your design, and how much control you have with the gun.
Let the glue on each side harden for a few minutes before continuing on to another side. (Remember not to let the glue gun sit unattended if you have children or pets.) Prop the bottom of the container up with the pen if the pot is tapered so much that the hot glue will run down the side of the pot.
 If desired. Punch one or two thumb tacks into the sides of the container. (or nails with large heads). As an alternative, you could make the entire design from thumbtacks.
 Spray the container with silver metallic paint. When the silver paint is completely dry, brush the container with a solution of 1 part black craft paint and 1 part water. Make sure black paint gets into every groove and undercut. Using a clean, absorbent rag, wipe most of the black paint off, leaving it in the receded areas for an antiqued look. You will want to wear those disposable latex gloves for this step.
The best results come from wiping each side both horizontally and vertically after you have applied paint to the inside rim and all four sides, then dabbing with the rag to remove any streaking. Work quickly, and do not let the paint dry before you can dab it to the look you want.
Using scissors, cut between the circles, so that you have 12 squares. I found cutting the felt into strips of four circles, and then cutting crosswise into individual squares makes the work go quickly.

Using the pinking sheers (or ordinary scissors), cut just inside the lines, so no ink shows on the edges of the circles.
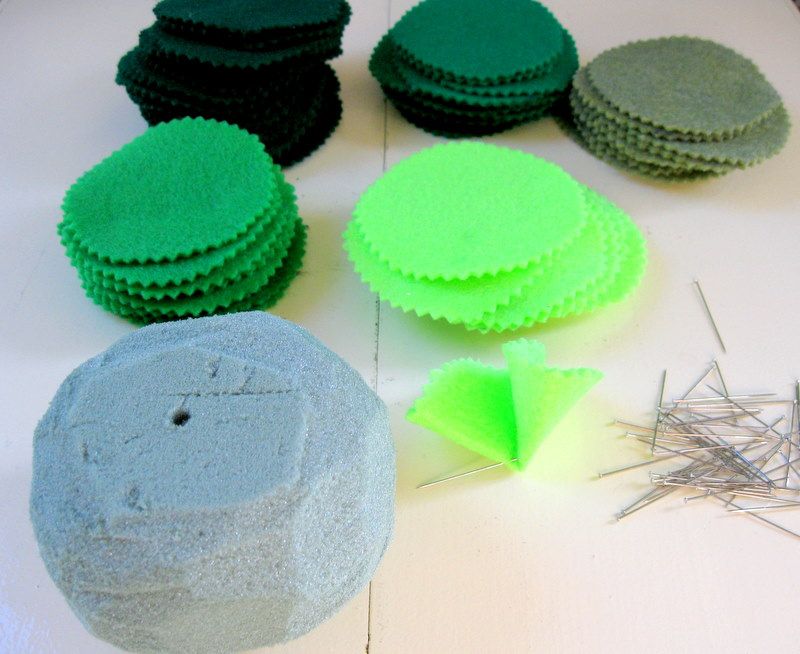
 I chose dry floral foam instead of white Styrofoam because it is easier to insert ordinary straight pins without wearing out your fingers. If you prefer Styrofoam, you can use pins with round heads. If using the square of floral foam rather than a sphere, use scissors and shave corners from the square until you have a roughly round sphere, about 3 inches in diameter
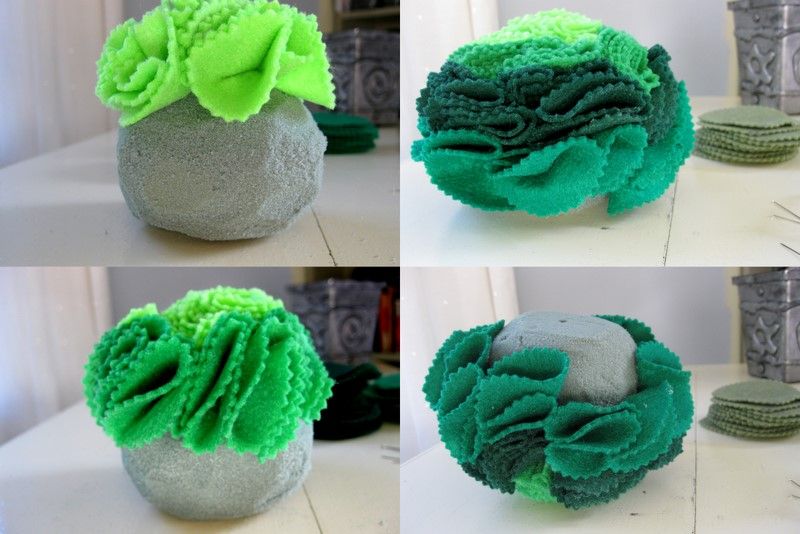
Mark the center bottom of the foam sphere with a small hole, where the topiary stem will go. Begin attaching your felt circles at the top, working in circles as you move down the sides of the sphere. I used the lightest greens at the top, but you might prefer a random pattern of mixed greens, or place the light ones in a band around the middle.
Alternate the direction of the individual circles as you go. You can fine tune the arrangement when you’ve got all the folded felt circles pinned on. Check that the hole you’ve made in the center bottom stays at the center of your design. Push the pins firmly into the foam.

Find the center bottom hole and insert the 18-inch stick straight into the bottom of the foam. Insert the other end into the foam in your antiqued silver container. If the stick is unsteady, add some hot glue to keep it centered, checking the position of the stick from all four sides to be sure it is perfectly perpendicular.
Cover the surface of the foam in the container with sphagnum or sheet moss. Tie or glue a bow made from the 4 feet of wired ribbon.

No pinking shears? No problem. You can still make a beautiful felt topiary, like the white one above (perfect for a wedding favor or centerpiece). And if you don't want to decorate with designs or thumbtacks, simple lines, like the ones in the fourth photo above, will still add the look of weight to your humble plastic flower pot.
Fit pieces of floral foam into container, creating a tight fit that will support the stick that is the stem of the topiary.
Using the marking pen, draw lines on the sides. You can use a strip of cardboard to guide you if you are not comfortable about drawing freehand. It doesn’t have to be precise.
Lay the container on its side. Heat the glue gun and trace the lines you made. With the glue gun, draw a swirl or star or an initial in the center of each side.
Practice with the glue gun on a scrap of cardboard if you are unsure of your design, and how much control you have with the gun.
Let the glue on each side harden for a few minutes before continuing on to another side. (Remember not to let the glue gun sit unattended if you have children or pets.) Prop the bottom of the container up with the pen if the pot is tapered so much that the hot glue will run down the side of the pot.

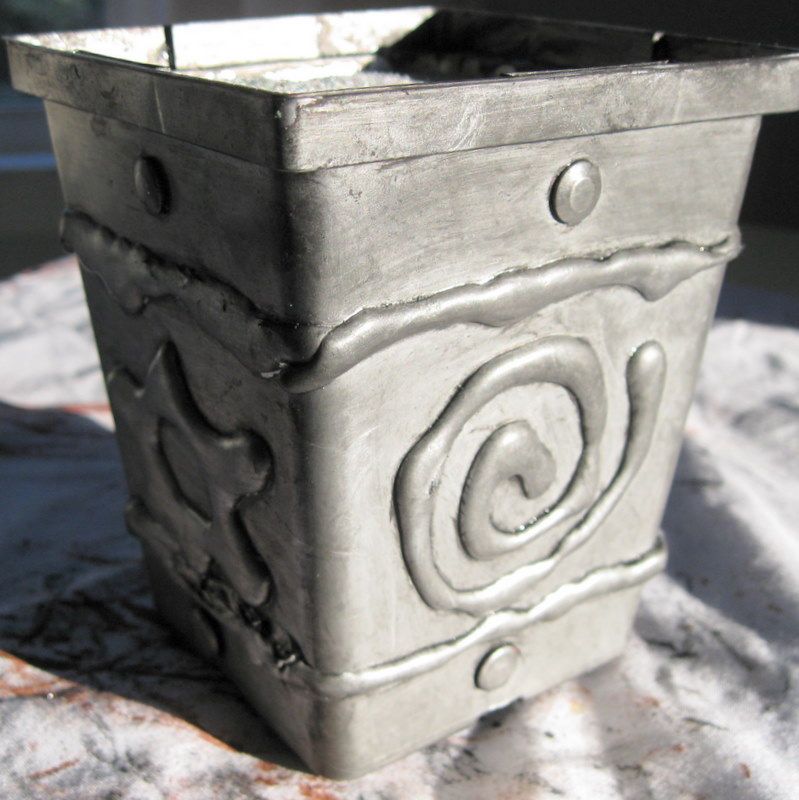 |
| Your finished pot should look something like this. |
The best results come from wiping each side both horizontally and vertically after you have applied paint to the inside rim and all four sides, then dabbing with the rag to remove any streaking. Work quickly, and do not let the paint dry before you can dab it to the look you want.
Topiary: what you need
- 3-inch round glass or plastic cup
- 3-inch sphere or square of dry floral foam
- 2 9- x 12-inch pieces of medium green felt
- 1 9- x 12-inch piece of chartreuse green felt
- 1 9- x 12-inch piece of light green felt
- 1 9- x 12-inch piece of medium green felt
- 1 9- x 12-inch piece of olive green or blue-green felt
- Ballpoint pen
- 72 straight pins
- Scissors
- Pinking shears (optional)
- 18-inch bamboo stick or straight branch, about ½ inch in diameter
- 4 feet wired ribbon
- Sheet moss or sphagnum
Topiary: how to do
Using the glass or clear plastic cup, and a ballpoint pen, trace 12 circles on each felt square. If there is a small amount of overlap, the circle can be slightly askew, but the edges should all the curved. I like using the clear container because you're able to see the entire circle as you draw it. Each sphere will take about 72 circles of felt -- more or less.Using scissors, cut between the circles, so that you have 12 squares. I found cutting the felt into strips of four circles, and then cutting crosswise into individual squares makes the work go quickly.
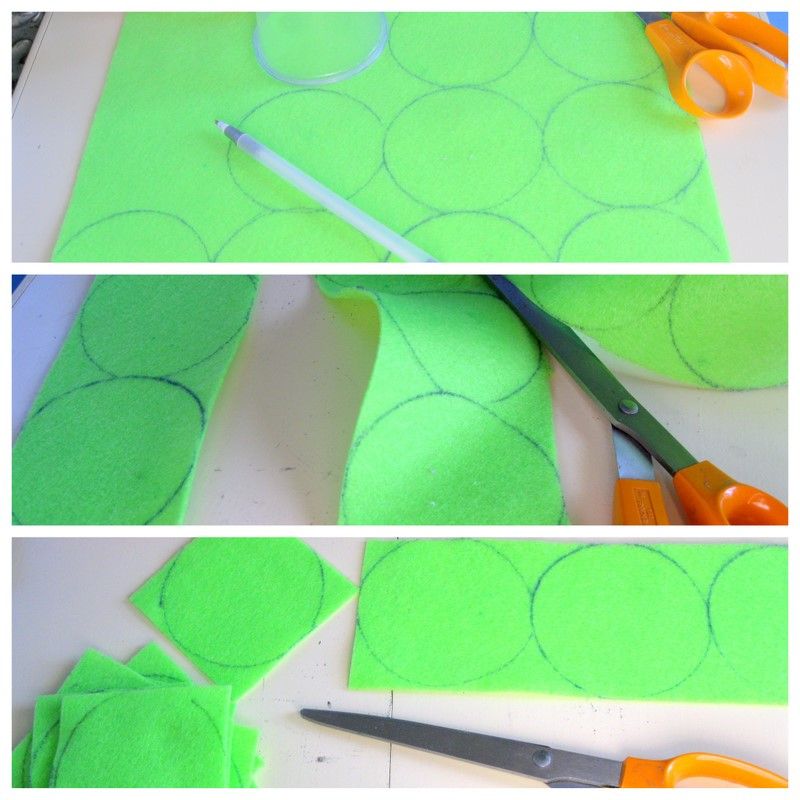
Using the pinking sheers (or ordinary scissors), cut just inside the lines, so no ink shows on the edges of the circles.
Mark the center bottom of the foam sphere with a small hole, where the topiary stem will go. Begin attaching your felt circles at the top, working in circles as you move down the sides of the sphere. I used the lightest greens at the top, but you might prefer a random pattern of mixed greens, or place the light ones in a band around the middle.
Alternate the direction of the individual circles as you go. You can fine tune the arrangement when you’ve got all the folded felt circles pinned on. Check that the hole you’ve made in the center bottom stays at the center of your design. Push the pins firmly into the foam.
Find the center bottom hole and insert the 18-inch stick straight into the bottom of the foam. Insert the other end into the foam in your antiqued silver container. If the stick is unsteady, add some hot glue to keep it centered, checking the position of the stick from all four sides to be sure it is perfectly perpendicular.
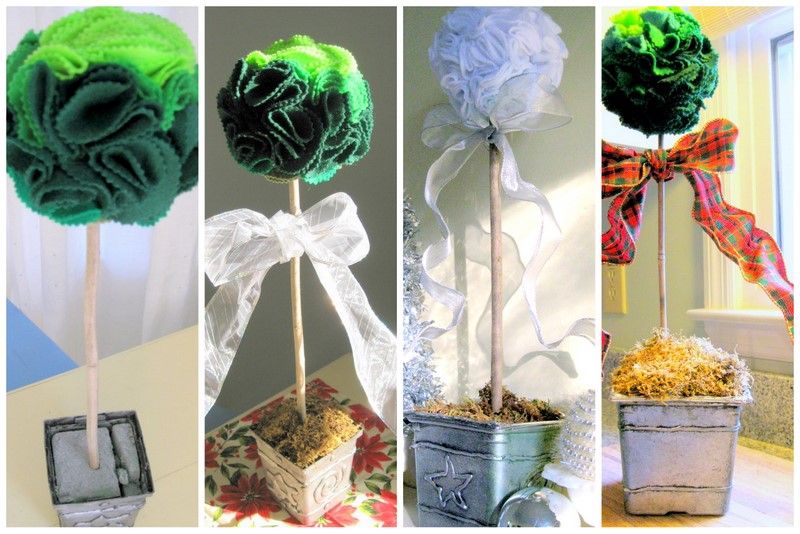
No pinking shears? No problem. You can still make a beautiful felt topiary, like the white one above (perfect for a wedding favor or centerpiece). And if you don't want to decorate with designs or thumbtacks, simple lines, like the ones in the fourth photo above, will still add the look of weight to your humble plastic flower pot.


