What Home Sellers Can Learn from Todd Smith

Thursday, November 25, 2010

Since it's Thanksgiving Day, I wanted to share a post from blogger, author, and entrepreneur, Todd Smith. Todd's comments have to do with cultivating a grateful mind, an important habit for all of us, and especially for people who have a home to sell.

What's your position?

Many home sellers are simply wanting to get out from under a mortgage they aren't able to keep up with. Others might be a few steps away from foreclosure. I hope you are not one of those. I hope you have decided to sell your home for all the best reasons -- a new job, a more suitable home, a more desirable neighborhood, better schools, or purely for the adventure that a change brings.

When you visit Todd's site, Little Things Matter, be sure to read "Meet Todd," because he has an interesting personal story about how he worked to become a successful real estate agent. Whether you are an agent, or someone who works with a Realtor, you'll be impressed with his attention to detail as a formula for success.

Start small because small is important

While I've designed my site to give you advice on staging your home to sell faster for a good price, Todd offers up an abundance of smart information on all kinds of life skills, from managing your time and your money, to building better relationships and losing weight. His stress is always on the small but important details.

Home staging and decorating share that same need for attention to detail. Decorator/designer Eddie Ross said that one of the things he learned while working for Martha Stewart was that details are what make the difference in crafts, table settings, decor...whatever. 

Don't let D.O.M spell doom

Paying attention to details, and keeping a thankful mindset are especially helpful when your home has been on the market for a longer time than you expected. I talk about the challenges of living in a home that's seen too many days on the market in my eBook, DIY Home Staging Tips to Sell Your Home Fast and for Top Dollar. 

I hope you all have a happy Thanksgiving, counting your blessings. My readers will be among the many blessings I count.

Ten Ways to Rock the Global or Boho Look

Monday, November 22, 2010
I usually advise against ethnic decorating for staging, but the global or boho look is so handsome that I wanted to find a way home stagers could use it.

Global decor is characterized by its cultural diversity, its love of color, texture, and pattern, as well as its emphasis on items made by hand from natural materials.

From a staging point of view, though, global decor has some problems. First, it tends to be dark or muddy, with undertones of browns -- not crisp and clean. Secondly, some demographic groups prefer a more red-white-and-blue approach, more Ralph Lauren than Pier 1.

Finally, ethnic decor can give off an artsy or eclectic look that's not understood or appreciated by less sophisticated buyers. 

Unique objects can be distracting and confusing to some people.
    But if you want to make your rooms memorable for people who are looking at multiple homes, the slightly exotic flair of global decor might be the way to do just that. Global design is more likely to resonate with buyers in more metropolitan areas than in small towns, and more with younger buyers than older ones. Still, some elements appeal to everyone.

    To make global decor appropriate for staging, here are tips.

    Limit the wild stuff 
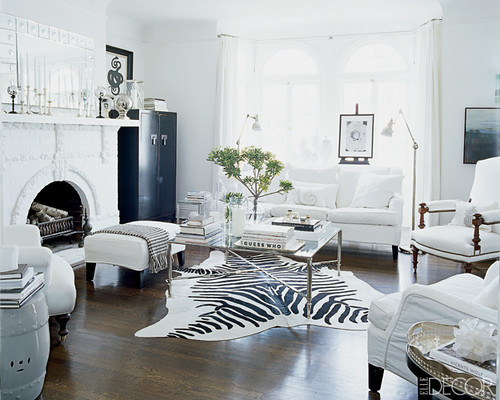
    Photo: Elle Decor
    This San Francisco room belongs to Monelle Totah, who is vice president of design at Williams Sonoma. It manages to capture the fun vibe of global design and still look sophisticated. For home staging, one zebra rug is gonna be enough for the whole house! Go easy on the bizarre. Not only is it distracting, but you want buyers to relate to you in a positive way, not wonder what the heck kind of person lives here.

    Keep the color scheme simple 

    Even though this room uses modern materials like glass and steel, the look is ethnic because it's accessorized with bold, handmade objects. The room is grounded by a simple color scheme of black and white. With touches of wood, the effect is one of comfort and richness. Simplicity's important to keep house hunters from feeling overwhelmed. 

    Accessorize with whimsy

    Touches of some humor make a room more friendly to buyers. 

    While global style often counts on bold carved or painted masks to create that well-traveled look, a home stager will get better mileage from whimsical and abstract art.

    Also on the list of what to pack away: paintings of saints, statues of Buddha, crucifixes, Krishna shrines, and other religious artifacts. Buyers can have emotional reactions to the connotations these items carry.  

    Buy from fair trade sources 

    You can purchase decor items like trays from the importer, wholesaler, and retailer, Ten Thousand Villages, a nonprofit fair trade organization that markets handcrafted products made by local craftspeople from more than 130 artisan groups in 38 countries. Through their website and stores, you can purchase decorative and useful items from around the world and know your money is going to the people who make them. 

    Collect your own props

    When you travel and when you are out and about in nature, you can be staging your home at the same time! Be on the lookout for found objects and souvenirs that fit with a global look.  This could include a Navajo blanket from your trip to the Southwestern U.S., or the acorns you gathered on your walk in the woods. Of course, shells are always a favorite decor prop, whether collected or purchased. 

    Use natural materials

    Natural materials make global decor
     warm and real. Photo: Flynnnside
    Out Productions via HGTV
    Global style -- also called tribal style --  focuses on natural woods and fabrics, and other organic elements. 

    Think tropical woods like mahogany, teak, walnut, and other dark stained woods. Textiles should be silks (or silk look-alikes), cotton, and linen.

    Wicker and rattan are perfect, are not expensive and contribute to a textured, layered look. Bamboo is one green product that's currently showing up in all kinds of ways, from flooring to fabrics to cutting boards.

    An area rug of sea grass, jute or sisal will  set the tone for a room built around natural materials.

    The danger here for someone staging her home for sale, is veering too far into rustic territory. Most buyers feel more confident when they see familiar objects. They prefer to be surrounded by what they consider to be luxurious rather than what they see as unrefined or primitive elements. It helps to know your market, and who your most likely buyers are. Oriental and dhurrie rugs are classic and safe.

    Your props have to work for staging. This means that faux finishes, if convincing, can help you create a natural look. Perhaps you'll choose to turn a laminate countertop or plastic plant container into one that looks like stone, or paint a group of picture frames to imitate ebony. That's just good staging.

    Don't forget that greenery, real or silk, is one of the best ways to give a room some life. For the style we're talking about here, tropical plants with big leaves, as well as wild grasses, will contribute to the look.

    Lay on the textures 

    A variety of textures make the room look interesting. Nubby rugs, smooth walls, glassy metals, and some pillows with interesting textures and rich colors, all add up to a room that makes buyers want to stay a while.

    The more time house hunters spend in your home, the more emotionally invested they become, and the more likely you are to see a purchase offer. Retail stores and online sites know this rule. They encourage lingering, making the most of the time customers spend with them.

    Add handmade accessories 

    Look for one-of-a-kind items like bowls, baskets, sculptures, rugs, and tapestries.  Many retail stores and boutiques offer unique collections of decor accents like pillows, frames, and candlesticks. Thrift stores can be a treasure trove of unusual, ethnic props. Shop World Market, Boho Luxe Home, and Island Woods for ideas and products. Avoid anything crudely fashioned because it could cheapen the look you're aiming for.

    Keep it informal

    Incorporating some formal touches will add elegance. Many Americans, especially older ones, tend to equate quality with poshness and formality.

    To keep the global look from looking too casual, add formal flourishes like pairs of chairs or pairs of lamps. Some shiny surfaces like glass, metals and mirrors push a room towards more formality. In this photo, the matched chairs and sets of pillows, plus the sparkling chandelier, all the mirrors, and a glistening silver tray keep this room from looking too informal.  
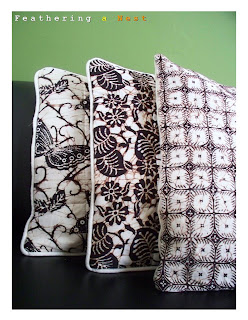
    Add authentic items 

    Photo: http://www.featheringanest.blogspot.com
    Pulling off the tribal look with aplomb isn't difficult when you mix in some traditional arts. One example is batik, a distinctive fabric print made by painting designs with hot wax before the fabric is dyed. It has a look all its own.

    You can count on the traditional arts and crafts of any country, including Native America, for decorative elements.

    You can even mix pottery from Mediterranean countries, textile wall hangings from India, wooden picture frames from Bali, lacquerware from Japan, punched tin from Mexico, painted tiles from Morocco, and bark paintings from Africa.
    I talk about what styles of interior decoration work well for home staging and which ones don't in my eBook, DIY Home Staging Tips to Sell Your Home Fast and for Top Dollar.

    The appeal of global decorating is its richness of textures, variety of patterns, and saturation of colors -- techniques you can incorporate into almost any home. Frugal DIY home stagers can easily imitate this warm and relaxing style because they can find many of its characteristic elements at flea markets and second-hand stores.

    So, pretend you're taking a trip around the world, and have fun with this approach to staging. Adding some international flair will inject the kind of style that will make your home the one that buyers remember.

    Girl's Guide to Painting Your Front Door

    Wednesday, November 17, 2010

    Yes, you can paint your own front door, and do it perfectly! 

    What makes this a girl's guide rather than a uni-gender guide?

    First, you'll paint the door in place, so there's no need to pull hinge pins and lug the door somewhere to put on sawhorses.

    And like a real lady, you'll get beautiful results without making a mess. You'll do it the right way. My way. If that's not female thinking, what is?

    Do not paint a door the way most HGTV hosts paint a door, with it closed, and starting in the middle. So wrong. I've painted many doors, both interior and exterior. These are my best tips.

    Test your door

    Even before you decide on a color and go to buy your paint, you'll need to know if your door was painted the last time with oil paint or latex paint.

    If you put latex paint on top of glossy oil paint, it will not adhere, and it can begin soon to flake off.

    Testing is simple. Dip the corner of a rag in rubbing alcohol. Rub the moistened rag on the paint surface. If any paint comes off, it is latex paint. If no paint comes off, it is oil paint. If you have a door painted with oil paint, you will have to apply a bonding primer, or else use oil again.

    You do not want to use oil, and in many states, you cannot even buy oil paint anymore. Talk to your paint supplier about a good bonding primer.

    It helps to know the names of the different door sections.

    Timing is everything

    Choose a day that's good for painting. Since you'll have to keep your door open, it's best if it's not too hot or cold. If your door is a metal one, it's especially important that you not paint on a day so hot that the metal is hot, because your paint will dry too fast, making it difficult to get good results. A windy day isn't good either because the air is full of junk.

    You need a day when it's okay to leave the door ajar for a few hours. Start when you have more than an hour of undisturbed time because you can't walk away mid-project. If you start late in the day, you want a two-day window of good weather.

    Have a plan

    Read these instructions. That's the girly way. Gather your supplies. Here's the list:

    • Work clothes and gloves, because you're bound to get paint on you.
    • Fine sandpaper, about the same grit as one of your emery boards.
    • Clean rag, damp on one end, dry on the other.
    • Broom and dustpan, because debris in wet paint is problematic. 
    • Dropcloth, see my thoughts on dropcloths here.
    • One quart latex exterior paint, either semi-gloss or satin finish, but you'll use less than half of that amount, in case you want to use something you already have on hand.
    • Stir stick
    • Clean work bucket (empty 1-gallon paint can or a plastic bucket)
    • Paintbrush, a good one, 2 to 3 inches wide
    • Masking tape (optional)
    • Step stool if you are under 5'5"

    First step: Prep

    With the door closed (just like on television!), sand the entire surface. Open the door, and sand the hinged edge and around the perimeter where you couldn't sand with the door closed. Fine-grit sandpaper is good for most doors, but if there are rough spots or drips, or lots of trash in the last painter's paint, use a medium-grit to start with.

    Place something immovable behind the door so you can paint it in an open position without it moving or fighting you. Use something heavy, but soft enough that it won't scratch the interior door surface.

    Sweep the floor all around the door and get rid of all dust and loose stuff. Lay a drop cloth under the door and cover up or move away anything that can be damaged by paint, like your welcome mat, flower pots, porch floor, brick steps, handrail, or furniture. Use the damp rag to wipe down the surface of the door.

    If you see mildew on the door, wash it with a 50/50 solution of bleach and water, then wipe with a clean damp cloth. Make sure the door is dry everywhere before continuing.

    Cover with masking tape anything you think you will have trouble painting around cleanly, like the doorknob, knocker, house numbers, or the rubber sweep along the bottom edge. I chose to just paint around the doorknob, sweep, house numerals, and glass.

    Pop the lid

    Open the paint, and carefully stir it with the stir stick. Pour all of it into the work bucket and stir again to distribute any solids.

    Wipe the lip of the paint can with your brush, and use your rag to clean off any paint that dripped down the side, so you'll always have a legible label on your paint can.

    Replace the lid on the can and get it out of your way so you don't back up to admire your work and trip on it.
    When doing this part, end the paint edge 
    in the grove so it's easy to get a straight line. 

    Edge it

    Paint the hinged edge first. The rule is when a door is painted different colors on two sides, each of the side edges gets a different color.

    The hinged edge gets the outside color when the door swings in. If your door swings out (the way storm doors do) the leading edge -- with the knob -- gets the exterior color.

    The door I'm painting had painted hinges, so I had to paint them again.  If your hinges are still metal, paint around them, or mask them with tape.

    Keep a clean line on the edge so paint doesn't wrap around to the inside of the door. Use the damp edge of your rag to clean any paint that goes where it shouldn't.

    Next, I painted around the house numerals, the glass, and the knob.

    Do the reveals and panels

    If your door has raised panels, paint the reveals next. Then paint the panels themselves. Double-check that no paint is dripping down the corners of the reveals.


    The final up-and-down strokes should cover
    the ends of your crosswise strokes.

    Paint cross  pieces

    Next paint the rails, starting with the top one, continuing to rail #2, then rail #3 which includes painting around the knob, and finally #4 at the bottom.

    When you paint the bottom rail, keep paint off the flexible rubber sweep, unless it was painted already by the last painter, in which case you might as well paint it again.

    Paint up and down 

    Finally, paint the stiles. If you can manage it, make the final brush strokes on the two side stiles go from top to bottom in one stroke.

    Start with the stile on the hinged side, and finish with the knob side, keeping a clean, straight edge because that's the edge you'll see most often.

    To get a clean line on the vertical edge of the door, lightly load the brush with paint, and lay it crosswise at the edge, patting the paint lightly as though you were applying blush, or frosting a delicious chocolate birthday cake (fantasizing here). This way, you're letting the natural edge of the door make painting a straight line easy. Then, make a vertical stroke to smooth out the paint surface.
    Start the edge strokes like you are frosting a cake. 

    While the paint is still wet, check every square inch of the door's surface to be sure you don't have drips or runs. Latex paint dries quickly, so depending on the temperature of the day and of the door, you may not be able to do overbrush strokes. But you can dab away drips.

    What's the roller story? 

    I often use a small roller to paint doors because it leaves a stippled surface that usually levels out to give you a uniform surface with no brush strokes. Brushstrokes aren't necessarily a bad sign, as long as they are smooth and even.

    I wrote about the Whiz roller system. If your door is one large flat surface, I recommend using the small roller after first cutting in the tricky parts with a brush.

    If you choose to use a roller, you could finish
    the job with your roller at this point in the project,


    Pickup time

    Wait until the paint is thoroughly dry to remove the drop cloth.

    Meanwhile, pour your paint back in the original paint can and wipe the lip and clean off the label if there is paint covering any lettering. This way, you'll always have a record of what is in the can.

    Mr. Lucky is saying to me, "Be sure to tell them to use a good brush."

    Okay. Use a brush that has a tapered tip. I'm not talking about an angled brush, although that would be fine to use. A tapered tip means the bristles will end gradually, like a layered haircut, not bluntly.  Tapering is what gives you good control of the paint.

    Wash your brush well, even if you will be using it the next day. Use warm water and a little dish detergent to help dissolve all the paint on the brush.

    Drying, Here is when a storm door helps protect your
    door until it is completely dry. If bugs fly into the
    wet paint, let them die, and then pick them 
    out of the dried finish of the open door. 

    I always switch to latex gloves for this operation because whatever chemicals are in paint to make it dry fast, are hard on a girl's hands. If you got an early start and you are putting two coats on the door in one day, you could wrap your brush bristles well in plastic wrap until it's time for the second coat.

    The second coat always goes faster, because the prep work is done and the surface is smoother.

    Watch paint dry

    The longer you can leave the door slightly ajar, the better. Closing it too soon could off-set the paint onto your trim or gasket, and that's never a good thing. But isn't your newly painted door pretty?

    Since your entrance is such an important part of curb appeal, painting a front door is something every gal should know how to do.

    Download my eBook, DIY Home Staging Tips to Sell Your Home Fast and for Top Dollar, for more helpful tips and techniques to make your DIY home staging effective and easy.


    The Easy Way to Stage Your Holiday Home

    Thursday, November 11, 2010
    Your home is on the market. You're staging it to make it any one's dream home.

    So far, so good.

    Then along come all the end of year holidays, starting with Halloween and ending with New Year's celebrations.

    Not only do the accompanying traditions throw your household into a whirlwind, but there's the decorating thing.

    Let's make sense of how to handle holidays in the middle of a staging situation.

    You can expect that home tours are going to be less frequent. Folks are busy spending money and time in other ways.

    Househunters are out there

    Even in the dead of winter, there are still buyers shopping for homes. No matter what the season, schedule or weather, they are ready to shop for their dream home! These are serious buyers, with a wish list and money to spend.

    My advice to people marketing their homes is to keep seasonal decorations to a minimum. If your home is already lovingly staged, the decorations may be a major distraction.

    Next year at your new home you can go all out!  Let that thought soothe your decorating soul for now. This year, concentrate on making your home look clean and spacious.

    It goes without saying that not everyone celebrates the same religious and cultural traditions, so just as with the rest of your home staging, keep it generic. People like to buy from people they share values with, so be the enigmatic and universal person.

    If you are one of those people who looks on seasonal decorations as a chore, you have a pass this year. You can guiltlessly keep it simple. Here are some examples.

    Because it's red, a wreath like this will carry you from November 
    through January. Thevendors.com photo. 
    A smart stager can simply substitute a bright holiday item for a piece of art. Odietamo.blog.blogspot.com photo.
    What could be more lovely than a classic entrance trimmed in evergreen and moss? Or a wreath made of pinecones (below)? Martha Stewart photos.


    Choose a holiday color scheme and go with it. Limiting your seasonal decor to just silver or just red, or shades of teal and blue, will make it easy to simplify and still look festive. And you'll avoid the temptation to go over the top.   

    The default decorating color option is white, so go with that. You can visit my Pinterest Board for White Christmas for ideas.

    So, remember to keep your inflatable Santa and collection of gingerbread houses packed away this year, and enjoy your pared-down, staged home.

    Get the look, get the book

    Do you need more specific advice about decorating your home? I offer all kinds of tips for making your home market-ready, including three rules for doing tablescapes right, and five formulas for dressing the mantel in my $4.99 eBook, DIY Home Staging Tips to Sell Your Home Fast and for Top Dollar.

    How to Get the Hang of Picture Hanging

    Monday, November 08, 2010
    Art in the staged home fills wall space, and gives weight, warmth and personality to a room.

    There are only a few things you need to know about hanging artworks on walls.

    Simple Rules

    Hang art at eye level. The average American male is 5'10", and the average female is 5'3", so the center of your art should be about five and a half feet off the floor.
      Hang the largest piece of art on the largest wall. Also, leave one wall bare, but not the largest one.
        Cluster like with like. You won't hear an interior decorator tell you this, but in a home staged for the real estate market, simplicity and clear intentions rule. Don't mix paintings with posters with photographs with textile wall hangings, all on the same wall.

          Choices

          Choose art that makes buyers feel comfortable and confident. Stay with landscapes, seascapes, animals, abstracts, and still lifes.  Avoid political, ethnic, religious, confrontational, or controversial art, including nudes.
            Photographs, drawings, prints, and posters should be framed under glass, and the mats surrounding the prints should be wide and white.  Painting should have frames.
              Use wall hangings other than prints and paintings for variety and texture. Hang baskets, plates, masks, wreaths, and carvings.
                Resist the urge to prop framed art against the wall on a dresser, table, or the floor. Hang it up. Art that's just leaning against a wall looks too casual and unfinished in a staged home.
                  There are a gazillion ways to arrange a group of pictures. Okay, not a gazillion, but here are some samples to help you appreciate wall arrangements done well.

                  Plates become art when artfully arranged. Photo: Better Homes and Gardens Magazine
                  Clean and bold to emphasize the fireplace. Photo: Meredith.com
                  Every room needs art. Photo: sunnysblog.typepad.com

                  Once you have sold your home, it's great to be able to un-stage without patching and touching up walls.  Command Hangers that stick to the wall but let you peel them off, are the way to go. No holes!

                  Art is too important an element of home staging to mess up. Follow these simple tips, and get more advice on how to find, select, arrange, and even make your own art for staging in my eBook, DIY Home Staging Tips.

                  If Lovin' You Is Wrong, I Don't Wanna Be Right

                  Thursday, November 04, 2010
                  Can you love something too much?
                  Waiting for a buyer is a little like waiting for your soul mate. Only not. You can't be that fussy.

                  Do you have a picture of the perfect buyer in your mind?

                  If so, erase it.

                  Just as you staged your home, stage your mind. Keep it clear and open. An open mind will look thankfully at whoever crosses your threshold with an offer.

                  What prompted this post is a short news article I read about a family who has a property to sell, one they've rehabbed themselves over the 40 years they've lived there. They've raised a family there. They've celebrated many milestones there. As a result, they've become emotionally attached to their precious property. Mistake!

                  what some sellers think

                  I also remember seeing one of those-sell-your-home shows on HGTV about a young man who was selling the house he had grown up in and inherited. His sentimentality caused him to put a price on the property higher than the appraised value, and at the same time, he was resistant to making changes to the house because of all the memories it held for him.

                  You just cannot do this and expect to sell your home for a good price. As Cher says to Nicolas Cage in Moonstruck, "Snap out of it!"

                  Not only will this kind of emotionalism prevent sellers from pricing a property correctly, they're more likely to be too choosy about buyers. In fact, in both these examples, the property owners admitted they are waiting for someone who will love their houses and take care of them the way they have. I call these people "not serious sellers."

                  If you are serious about selling, lose the preconceived notions of who the next owner will be.  Yes, it's gratifying to sell to someone who will always tend to your rose garden, appreciate your faux-finished vanities, and will use the home office you've lovingly built as an office, not as a family room or another bedroom, damn it!

                  True Story

                  Once upon a time when I was 16, I dated a young man my age of whom my parents did not approve, which was probably part of his appeal, but never mind. He wasn't college-bound, and he wore his hair in the style of a "juvenile delinquent," a la John Travolta in Grease. My sister's theory is that my bald Dad was just jealous of all that hair. The point is that he was a gifted artist, and I felt that we were soul mates.

                  He approached my parents with a plan, that we would be allowed to see each other, but not leave the house. That meant dates were limited to playing ping pong and listening to records in the basement rec room. The basement had cement walls, and since we both enjoyed painting (some things never change) we spent months painting a mural on the walls of the basement.  You can only play so much ping pong.

                  Attachments are not good for business

                  When it came time to sell that house seven years later, my mother said her one regret was leaving that mural behind. I hope it didn't cloud her judgment about what was an acceptable offer for the house.

                  I tell that story because I believe each of us could tell a similar story. It's only natural to form heartfelt attachments to your home. I've found that decluttering can help you begin the process of putting aside your emotions. Once your favorite family photos, trophies, framed certificates and souvenirs are packed up, you'll be further along on the path to detachment. Painting, rearranging furniture, and other staging tactics will also help distance yourself from the home, preparing you mentally for your next one.

                  Don't wait for the perfect buyer

                  By being too selective, you could be breaking fair housing laws. I find it hard to believe in our slow housing market that anyone would screen buyers based on whether they will tear down the property or not, or whether they have too many children, or are not the "right color" for your neighborhood, but it happens. Don't let this be you.

                  A real estate agent is bound by standards of the industry to present any serious, written purchase offer. Work with your agent and your buyer, and stay within the law, no matter what your personal opinions are.

                  Be sure to download my eBook, DIY Home Staging Tips to Sell Your Home Fast and For Top Dollar, if you want to learn both the basics and all the little secrets to getting a home sold!

                  Popular Posts